Saturday, July 27, 2013

Rafflecopter Givaway-The Polished Teacher Bloggy Birthday Alphapalooza

I am so excited that Ash from The Polished Teacher generously let me participate in her Bloggy Birthday Alphapalooza! I donated a Dignitet Curtian wire set along with a 24 pack of Riktig curtain hooks and clips

If you'd like to enter this great giveaway head over to The Polished Teacher to enter.

This giveaway is also includes donations from


Here are some ways you can use the product I have donated!


Monday, July 22, 2013

Monday Made It


This week for Monday Made It I made hand signal posters for my classroom. 
R-Restroom
W-Water
T-Tissue
Full hand- Question or Comment

You can get these posters HERE they will be free this week only :)

Thank You- Sara


Friday, July 19, 2013

Freebie Friday

Freebie Fridays
Yeah! My first Freebie Friday! I have been working on my math independent activities with frequent feed back ( what my school is calling stations now), which I have started calling "IAWFF". Anyway, our first set of IWAFFs are on place value :) I have chosen one of these to give as a freebie, and the rest will be available in my TPT store! I made one similar to this last year, but it included the word form of a number. I made this one because most of my students will not be ready for that extension, and because it is not in our TEKS. 
To get this freebie click HERE

Monday, July 8, 2013

Monday Made It


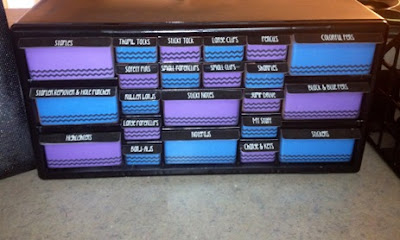
I decided to make the Teacher Toolbox today :) 
1. Spray paint your box without the drawers in.

2. Print, laminate, cut, and hot glue the tab labels from Ladybug's Teacher Files. Click here to download her free tabs.
When you finish gluing the labels on it should look similar to this.
3. Now if you want to put paper inside the drawers so you can't see inside  you can download the blank template here
For some reason I could not make it free, so just download the "PREVIEW", edit and save. That way you don't have to spend a penny :)


4. After you print out your template onto colored paper or scrapbook paper, cut it all out and tape it into the drawers.

After you are all finished it will look like this :) 
I used the PPT blank form and added chevron to 1 large drawer and 1 small drawer, then copied and pasted. I also rearranged the template so that 1/2 would print on purple cardstock and 1/2 would print on turquoise cardstock.  

If you have any questions comment below!
-Sara
Don't forget to enter 3 Teacher Chicks giveaway!

Tuesday, July 2, 2013

Goin' on a Blog Hunt


We're going on a blog hunt thanks to Corkboard Connections! I'm so glad Laura decided to have this link up, now I can share my blog and find new blogs to follow! I'm new to the blogging world, and trying to learn fast. I figured I would start in the summer and get used to posting frequently before the new school year starts up. I hope you like what you see/read, I will be posting new ideas and tutorials frequently. I hope to get up some freebies and giveaways soon!

If you'd like to follow me through Bloglovin' click here!

Make sure you read the directions about this link up :)

Tutorial Tuesday Link Up


Okay, I am going to attempt to host a Tutorial Tuesday linky party! For my first Tutorial Tuesday I decided to tackle something on my to do list, tulle poms. Last year I had tissue paper poms, and after a school year of fluorescent lights and natural light from my classroom window they are pretty faded.

Here is a list of things you will need:
1 roll of 6" wide tulle per pom  (25 yards)
Fishing line
Scissors
Something round to trace 
Pen or pencil to trace with
Cardboard


Here are the steps for making these cute tulle poms:

1.Use something circular that is around 12” in diameter to trace onto your card board.
2.Take a smaller circular thing, center it on the template and trace.
3.Use a pen or something sharp and poke a hole in the inner circle to fit your scissors through.
4.Poke your scissors through the hole and cut around the line.

5. Cut around to outside circle.
6. Make another identical template.
7. Tape the fishing line around the inside of one of the templates  in a horseshoe shape (like the arrow) .
8. Sandwich the two templates together and pull the fishing line out from between the middle of the 2 templates and simply begin wrapping the  tulle through the middle and around.
9. Wrap the first layer of tulle around the templates. Make both ends of the fishing line are out , and don’t loose them.
10. It should look like this when you run out of tulle. If you are left with tulle sticking out like me trim it to the edge of the template. If you look you can see me holding the fishing line …seriously don’t loose it.
11. Cut a slit right after your fishing line, and then start cutting in the gap between the 2 templates . Make sure you don’t accidentally cut your fishing line.
12. Make sure you hold the tulle in place as you are cutting so one side doesn't end up longer than the other.
13. After you finish cutting all the way around hold down the tulle with one hand and pull the fishing line tight with the other  to tie a knot. This is much easier to do if there is someone to help you, but my husband is working L . I had to..don’t laugh… sit on one side so the tulle didn't move that way both of my hands were free to tie a knot. I recommend wrapping the fishing line back around and tying another knot on the other side.
14. After you tie the knot it will look flat like this.
15. Just use your hands to fluff it all out by tugging on the flat parts and separating the layers
16. Here is what your pom should look like after you have finished


I plan to make more of these cute tulle poms for my classroom :) Here are the 3 I have made so far. Please Link up and share your wonderful tutorials. Don't forget to use the button at the top :)


Monday, July 1, 2013

Fabulous 4th Grade Froggies To Do Link Up

I'm linking up with Lorraine from Fabulous 4th Grade Froggies for my to do list before the first day of school

Here is my list of things to do for my classroom decor:

1. Finish my teacher toolbox
2. Spruce up my sterilite drawers with scrapbook paper
3. Make my crate seats
4. Make tulle poms to replace my faded tissue poms
5.Make curtains to match my classroom colors
6. Make table skirt for my small group table
7.Make the warning/behavior board
8. Use contact paper to stick numbers to the floor to help with "cutting" when lining up
9. Make math independent activity with frequent feedback board
10.Use Rit dye to dye my Home Depot aprons
11. Use Rit dye to dye clothespins
12. Make button banner to match my classroom colors


I'd love to read about what everyone else will be working on :)

~Sara