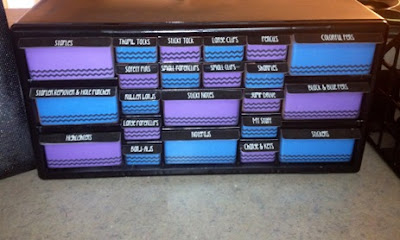
I decided to make the Teacher Toolbox today :)
.JPG) |
| 1. Spray paint your box without the drawers in. |
.JPG) |
| 2. Print, laminate, cut, and hot glue the tab labels from Ladybug's Teacher Files. Click here to download her free tabs. |
 |
| When you finish gluing the labels on it should look similar to this. 3. Now if you want to put paper inside the drawers so you can't see inside you can download the blank template here For some reason I could not make it free, so just download the "PREVIEW", edit and save. That way you don't have to spend a penny :)
4. After you print out your template onto colored paper or scrapbook paper, cut it all out and tape it into the drawers.
After you are all finished it will look like this :)
I used the PPT blank form and added chevron to 1 large drawer and 1 small drawer, then copied and pasted. I also rearranged the template so that 1/2 would print on purple cardstock and 1/2 would print on turquoise cardstock.
If you have any questions comment below!
-Sara
|
Don't forget to enter 3 Teacher Chicks giveaway!


Thank you for the resources! What a clever way to get a colorful pattern that doesn't involve a ton of ink! I'll try your trick. :)
ReplyDeleteI love the finished product! Thanks so much for the shout out about the Giveaway! I am your newest follower!
ReplyDeleteAmy
3 Teacher Chicks
What a great idea. I love those paper colors! I've nominated you for the Liebster Award-- swing by my blog to check it out! :)
ReplyDeleteMary Kate
Windy City Learning
Thank You! I bought the paper at Hobby Lobby to match my classroom colors :)
DeleteOhhh, I love the way your teacher toolbox came out! Loving the combo of the colors & the chevron, too. It just makes it look complete! :)
ReplyDeleteSara
Miss V's Busy Bees
ventrellasara@gmail.com
This is just awesome Idea, I would love to try this
ReplyDeleteNeha